Flash Tool for Atmel/Microchip MCUs. UPDI PROFI Tool : UPDI + USB-UART converter (USB Type C)
Designed by ProtoDevS in GermanyNo shipping info available.
Set destination country to see options
Shipping to starts at
Free shipping is available to !
Ships from
This item does not ship to .
More Info
Sign up to get notified when this product is back in stock!
UPDI tool for the newest Atmel / Microchip MCUs. UPDI PROFI Programming Tool + USB-UART converter (USB Type C) Small and robust programming tool to flash the newest Atmel / Microchip MCUs (microcont…
Read More…UPDI tool for the newest Atmel / Microchip MCUs. UPDI PROFI Programming Tool + USB-UART converter (USB Type C)
Small and robust programming tool to flash the newest Atmel / Microchip MCUs (microcontrollers). The device could operate with 5V and 3,3V levels to flash microcontrollers.
Moreover: this device has ISP/JTAG port so you can flash any firmware to support current AT series 0/1/2 MCUs UPDI programming and future models as well.
MCUs supported from megaAVR® 0-series Family (pre-flashed with ATMEGA UPDI):
ATmega808 ATmega809 ATmega1608 ATmega1609 ATmega3208 ATmega3209 ATmega4808 ATmega4809
MCUs supported from tinyAVR® 0-series Family :
ATtiny202/402 ATtiny204/404 ATtiny406 ATtiny804/1604 ATtiny806/1606 ATtiny807/1607
It runs on an ATmega328P with a Pro Mini bootloader, which means that the programmer itself is fully compatible with the Arduino IDE. USB-to-serial capability is provided by a CH340G, which gives full control for all of the UART signals: RxD, TxD, RTS, CTS, DSR, DCD, DTR. Mentioned above signals are easy accessible with 1,27 mm 10-pin connector (J5)
UPDI PROFI supports 3 different UPDI connectors :
Also, the device has :
Using a UPDI programmer Programming must be done with a UPDI compatible programmer, such as the microUPDI, JTAG2UPDI or an official Atmel/Microchip UPDI compatible programmer.
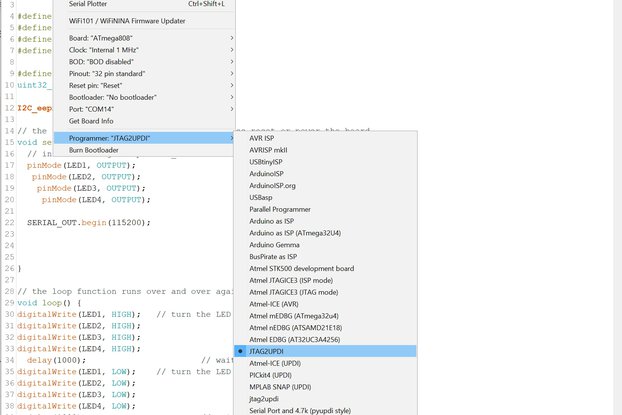
Unlike the Arduino UNO WiFi Rev2 boards package MegaCoreX does not auto-detect the programmer you're using. You'll have to select the correct programmer in the Programmers. If you're using an Arduino Uno Wifi Rev2 board, a Curiosity Nano or an Xplained Pro board you'll have to choose mEDBG, nEDBG or EDBG.
Using a bootloader Programming can also be done using the Optiboot bootloader. It is available for all megaAVR-0 chips and can be used with all hardware serial ports including alternative pin positions. Simply select what UART number to use, default/alternative pin position and click "Burn bootloader". The bootloader will flash an LED connected to PA7 (digital pin 7 on most pinouts) twice when a hardware reset occurs. The upload speed is 115200 baud. Note that that the reset pin cannot be used as a GPIO when using a bootloader. It doesn't matter if you have set the reset pin as GPIO in the tools menu or not; the bootloader option will override this setting.
Supported clock frequencies MegaCoreX lets you choose what clock frequency you want to run your microcontroller at.
Frequency Oscillator type Other
20 MHz Internal oscillator
16 MHz Internal oscillator Default option
10 MHz Internal oscillator Derived from 20 MHz osc.
8 MHz Internal oscillator Derived from 16 MHz osc.
5 MHz Internal oscillator Derived from 20 MHz osc.
4 MHz Internal oscillator Derived from 16 MHz osc.
2 MHz Internal oscillator Derived from 16 MHz osc.
1 MHz Internal oscillator Derived from 16 MHz osc.
20 MHz External clock
16 MHz External clock
12 MHz External clock
8 MHz External clock
1 MHz External clock
Note that unlike other AVRs none of these chips can drive an external crystal or resonator. If you need an external oscillator it has to be one with a driven clock output. The microcontroller will freeze if the external clock suddenly drops out. If not present on boot, it will automatically choose the 16 MHz internal oscillator instead.
Another thing to watch out for is the lowest possible baudrates when running at 16 or 20 MHz. At 16 MHz the lowest baud rate is 1200 baud. When running at 20 MHz the lowest is 2400 baud. This is caused by the way the internal baud rate generator works. If you need lower baud rates you'll either have to reduce the main clock speed or use the software serial library instead.
How to install Newest Atmel/Microchip MCUs for Arduino IDE :
Boards Manager Installation for ATMEGA series0 - MegaCoreX library
Open Arduino IDE. Open the File > Preferences menu item. Enter the following URL in Additional Boards Manager URLs: https://mcudude.github.io/MegaCoreX/package_MCUdude_MegaCoreX_index.json Separate the URLs using a comma ( , ) if you have more than one URL Open the Tools > Board > Boards Manager... menu item. Wait for the platform indexes to finish downloading. Scroll down until you see the MegaCoreX entry and click on it. Click Install. After installation is complete close the Boards Manager window.
Manual Installation
Click on the "Download ZIP" button. Extract the ZIP file, and move the extracted folder to the location "~/Documents/Arduino/hardware". Create the "hardware" folder if it doesn't exist. Open Arduino IDE and a new category in the boards menu called "MightyCoreX" will show up.
Example how to use this UPDI PROFI for flashing ATmega808 :
No country selected, please select your country to see shipping options.
No rates are available for shipping to .
Enter your email address if you'd like to be notified when UPDI Flash Tool for Atmel/Microchip MCUs can be shipped to you:
Thanks! We'll let you know when the seller adds shipping rates for your country.
| Shipping Rate | Tracked | Ships From | First Item | Additional Items |
|---|---|---|---|---|
|
:
|
No shipping info available.
Set destination country to see options
Shipping to starts at
Free shipping is available to !
Ships from
This item does not ship to .
More Info
Sign up to get notified when this product is back in stock!
$69.99
Free Shipping!
$28.90
Free Shipping!
$109.99
Free Shipping!
$29.90
Free Shipping!
By clicking Register, you confirm that you accept our Terms & Conditions
We recognize our top users by making them a Tindarian. Tindarians have access to secret & unreleased features.
We look for the most active & best members of the Tindie community, and invite them to join. There isn't a selection process or form to fill out. The only way to become a Tindarian is by being a nice & active member of the Tindie community!
