Unassembled kit hackable real time clock and scrolling text message board with RPI Pico. Also functions as LCD tester. Golang, Tinygo.
Designed by magnetosphere.net in United States of America
Buy with confidence.
Our Tindie Guarantee protects your purchase from fraud. Learn More
Parts included in kit A picture of the parts included in the kit to be added soon. 01 x Base mounting board for pico + LCD 01 x Base mounting board for LCD 01 x RPI Pico MCU microcontroller 0…
Read More…A picture of the parts included in the kit to be added soon.
01 x Base mounting board for pico + LCD
01 x Base mounting board for LCD
01 x RPI Pico MCU microcontroller
01 x USB to MicroUSB cable
01 x DS1307 real-time clock RTC module
01 x HD44780 (equivalent) blue backlight white text LCD module
01 x HD44780 (equivalent) green backlight black text LCD module
07 x 30-pin (15x1) dual row female headers
02 x 48 pin (24x2) dual row female right-angle headers
06 x 10x1 single row male right angle pin headers
01 x 5x1 single row male right angle pin headers
08 x 5x1 single row male pin headers (pico header pins)
36 x Female to Male header jumper wires
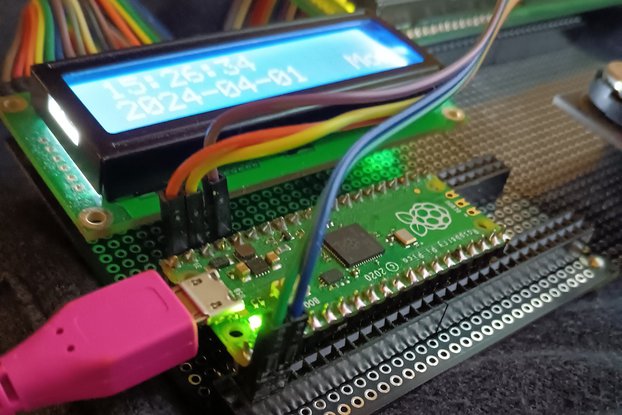
Unassembled kit of the hackable real time clock and scrolling text message board with RPI Pico micro-controller (MCU). Also functions as LCD tester. Two HD44780 LCD displays configured in 8 bit parallel operation. DS1307 real-time clock RTC. RTC is set via timestamp on compilation. Golang source code - compiled with tinygo.
I started making something to test LCD displays. Making a clock was an obvious application after the LCD testing was done. After testing connecting multiple LCDs, it made sense to have something besides the time on the other screen.
It's left to the user to decide what they want it to do. It invites the user to reconfigure it as they desire - the helper program supports reconfiguration of the 'Mode' or what is displayed on the LCD (clock or scrolling message) the update interval or scroll rate, as well as the mapping of GPIO pins to LCD pins via command line flags. This avoids the need to manually edit the source code in order to reconfigure the device to work with a different LCD or to change what is displayed on any LCD or how it is displayed.
The source code is in golang and compiles with tinygo.
Tinygo only supports single-threaded operation, though support for multiple cores is planned. As well, the subset of golang standard libraries which will work with tinygo is slightly limited. For instance, encoding/json wasn't working. This presented some challenges for configuration, as the obvious method of setting a json config as a string variable via ldflags and then parsing that at runtime was simply not working. This was ultimately solved with a bit of meta-programming. The helper or wrapper program for the workflow which is included with the source code will generate a help menu including different flags which can be set for the program that will be compiled for and written / flashed to the microcontroller. Some of these flags are set at compile time with ldflags and parsed at runtime, but others are essentially set via creation of a modified version of the source code which is then compiled and flashed on the microcontroller.
Note that this helper wrapper program is only guaranteed to work on linux, currently. It is not required to use it, you can always edit the source code by hand, if you prefer, in order to to change the configuration.
One of the 30-pin (15x1) dual row female headers will need to be cut in half with wire cutters. This becomes part of the socket for the pi pico.
Two of the 30-pin (15x1) dual row female headers will need the two pins at the end of the connector removed if the boards are connected together as shown in the assembled kit. The headers must be justified to the opposite side of the board relative to where the two boards meet. The large mounting holes should be aligned on one side for both boards, which will also align two rows of dip spaced holes, along the length of the boards on one side, the opposite side on each board; the holes on the right side of one board will align with the holes on the left side of the other board.
If the boards are to be assembled together as one, it's recommended to do that as the first step. In the pictured assembled kit, brass tacks were trimmed to fit in the holes and soldered with a high-powered soldering gun. Brass tacks are not included ; it is left to the customer to connect the boards using materials and methods available to them if desired.
The shorter female pin headers will require that the pins are bent slightly to fit in the standard dip-spaced holes. This can be accomplished by inserting one row of the headers into holes along the edge of the boards, and bending them at an angle. Rotate and repeat with the other row. Repeat this step until both rows of pins are able to fit into the holes simultaneously.
One potential pitfall is that the traces on the boards are barely visible. It may take an ohm meter to correctly determine which holes are connected to which other holes by traces. Do not insert or solder parts into holes without traces connecting them. The seller is not responsible for mistakes made during assembly.
The longer female right-angle pin headers must not be installed flush to the board, because the one header would prevent inserting wires into the other if both are installed at a 90 degree angle or flush with the board. Care should be taken to angle these female headers as far as they can be angled up from the board, for convenience of connecting the jumper wires.
Similarly, it's recommended to solder the male headers along the top of the board with adequate spacing between where the jumper wire fits on the header and the board, or at a slight angle up from 90 degrees. Insert from the front or back, either will work.
Header for the RTC to mount on the board is not included.
No country selected, please select your country to see shipping options.
No rates are available for shipping to .
Enter your email address if you'd like to be notified when Tinygo Pico HD44780 DS1307 RTC Kit++ can be shipped to you:
Thanks! We'll let you know when the seller adds shipping rates for your country.
| Shipping Rate | Tracked | Ships From | First Item | Additional Items |
|---|---|---|---|---|
|
:
|
Buy with confidence.
Our Tindie Guarantee protects your purchase from fraud. Learn More
$60.00
Free Shipping!

$10.00
Free Shipping!

$25.00
Free Shipping!

$30.00
Free Shipping!

$60.00
Free Shipping!
$130.00
Free Shipping!
$10.00
Free Shipping!
$7.00
Free Shipping!
$17.00
Free Shipping!
By clicking Register, you confirm that you accept our Terms & Conditions
We recognize our top users by making them a Tindarian. Tindarians have access to secret & unreleased features.
We look for the most active & best members of the Tindie community, and invite them to join. There isn't a selection process or form to fill out. The only way to become a Tindarian is by being a nice & active member of the Tindie community!
