TrackIMU is a naturally wearable, camera-free and wide field-of-view head tracking system for games. It offers natural viewing experience.
Designed by movsensllc in United States of AmericaNo shipping info available.
Set destination country to see options
Shipping to starts at
Free shipping is available to !
Ships from
This item does not ship to .
More Info
Sign up to get notified when this product is back in stock!
What is it? TrackIMU is a naturally wearable, camera-free and wide field-of-view head tracking system for games. It offers natural viewing experience. Why did you make it? When I was playing my video…
Read More…TrackIMU is a naturally wearable, camera-free and wide field-of-view head tracking system for games. It offers natural viewing experience.
When I was playing my video games, either Digital Combat Simulator (DCS world) or Project Cars, etc., I always think there should be an easier and better way to help me view the gaming scenes, aim my target, and do many other things, than using my hands and keyboard. So I hooked up an Arduino chip and a MEMS inertial sensor, and created TrackIMU.
Different from camera/webcam-based head tracking system, TrackIMU achieves all the head tracking functions with a single MEMS inertial sensor, MPU 9250, and an Arduino pro micro chip. It integrates all the components onto a single miniaturized device, dramatically reducing the need for hardware and improves the wearable head tracking experience for computer games.
How it works?
It is amazing that nowadays a single MEMS chip with less than 5X5mm footprint can give you 9 degrees-of-freedom measurement, including 3-axis gyroscope, 3-axis accelerometer and 3-axis magnetometer. All the raw signals can be processed on an Arduino pro-micro chip and talks directly to video games. The on-board algorithm takes care of all the data processing, which simply speaking is the data fusion of all 9 degrees-of-freedom measurement for a precise real-time rotation/orientation tracking. A TrackIMU main board integrates all the components in a miniaturized device. A plastic case enclosing the electronics gives it extra beauty and packaging rigidity when matching with your game headset. All you need to do is to simply calibrate the sensor and attached the device to your gaming headset, which anyway you already use for your games.
Even if you do not play video games, you will still find TrackIMU really useful as a precise rotation/orientation sensor, which is widely used for robotics, drones, vehicles, imaging stabilizers, and many other areas.
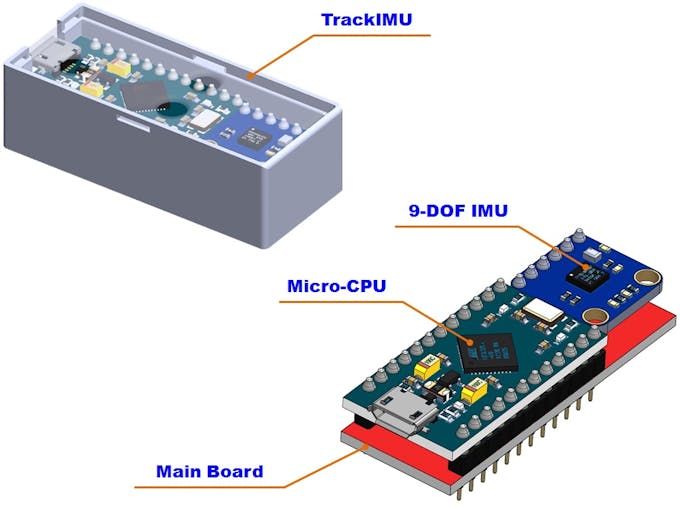
Make the TrackIMU Hardware
If you are interested in making a TrackIMU by yourself, go through the following steps. Alternatively, if you just want to get a device quickly for your own game or special application, you can start from Step 4.
Here is the list of components you need before you start: - MPU9250 board (10DOF MPU9250 + BMP180 / 10DOF MPU9250 + BMP280); - Arduino Pro Micro 5V 16MHz with TrackIMU firmware; - TrackIMU main board; - 3-meter MicroUSB cable; - TrackIMU case and 3M double side adhesive;
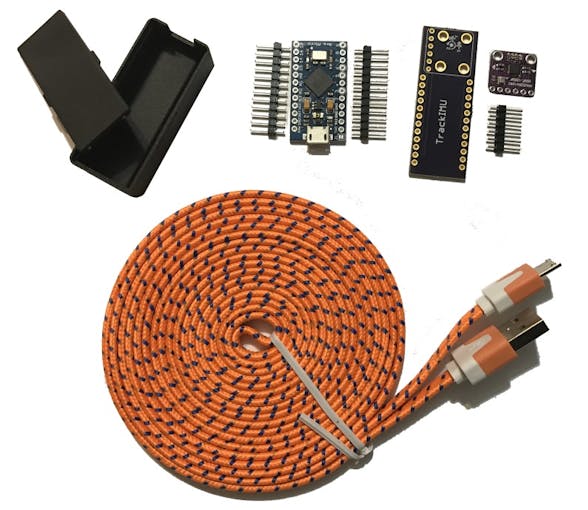
Step 1. Solder the electronics onto TrackIMU main board. As shown in Figure 3, With a pair of 12-pin connector, solder the Pro Micro chip onto the TrackIMU main board; with a 6-pin connector, solder the MPU9250 board onto the TrackIMU main board. Pay attention to the direction of the pro micro chip and mpu 9250 board relative to the TrackIMU main board. The side of the main board with the label of "TrackIMU" should face the chip components.
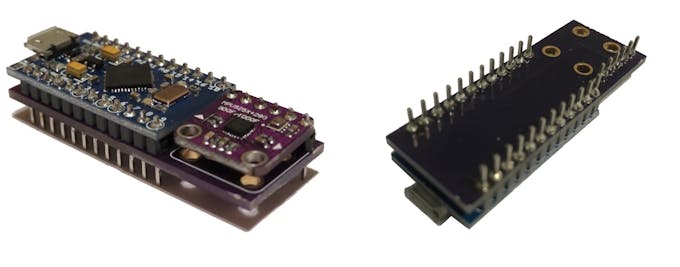
After the soldering, you have completed the electronics hardware, meaning the circuit connecting microprocessor and inertial sensors is built. Proper sensor data acquisition and processing system is established.
Step 2. Assemble the electronics hardware to the plastic case. This step is easy to do, but requires some careful operation. The board and the case have a tight fit. Insert he board into the case with USB connector residing in the recess on the short end wall. Then cover the case with snap fit. The plastic case is a high resolution 3D printed prototype, materials might be fragile, and that is why the case contributes a relatively large portion of cost. So give it some extra attention.
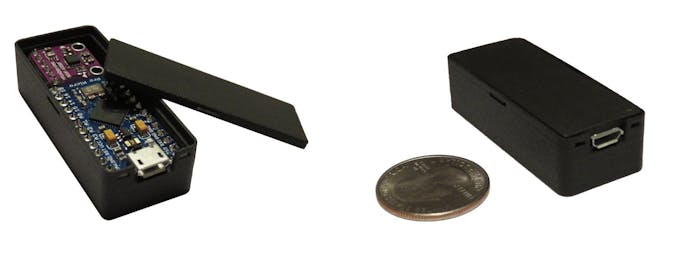
Step 3. Attach TrackIMU to your game headset. Cut a piece of double side adhesive, and use it to attach your TrackIMU on top of your headset as shown in the figure. Sounds easy, actually this step is very important. The TrackIMU needs to be fixed tightly on the headset. Otherwise, the measured movement is your head movement plus some additional movement of the device itself.

Step 4. Establish the communication between TrackIMU and your computer using USB cable. Before connecting TrackIMU to your computer, you need to install some drivers. Because TrackIMU uses Arduino chip as the processor, you need to install the Arduino Driver, which you can download from www.movsens/downloads . Now connect the cable, you computer will recognize it as a game controller (Figure 5), and in the COM port, you can also find its corresponding COM port number. This suggests that TrackIMU can directly communicates with your games, and it can also communicate data with your specific application through a serial port.

Calibrate the Sensor
TrackIMU uses earth magnetic field to find out the heading angle. However, local magnetic field can vary from place to place, and it can be distorted by magnetic materials, such as your cell phone, in the vicinity. Therefore, an accurate magnetic field calibration is vital for a precise orientation tracking. TrackIMU has incorporated all the hard part into the firmware, and developed an easy user interface for you. Here, you only need to follow the easy steps to do it.
Step 5: Download and Install the software
After step 4, your TrackIMU can now communicate to your PC. In order to get the best head tracking performance in your games, you need additional 2 software. One is "TrackIMU User Interface" made by MovSens, which helps you calibrate your device and validate the tracking performance intuitively. Download TrackIMU 1.0 (www.movsens.com) and install it. The other one is "OpenTrack", which is an open source software that communicates tracking data to your games. For some games, you do not need "open track", then you will setup within the game settings.
Step 6: Calibrate compass of TrackIMU and star tracking
a. Open the software, and you will see a graphic interface;

b. Select the COM port of your TrackIMU, baud rate (115200), and click "Open" button. Now you can see data streaming in the textbox and the helmet turns to certain position;
c. Click "Main Menu" button and the options is displayed in the textbox;
d. Click "B. Calibrate Mag" button; (You do not need to know technical details, but pay attention to the Compass calibration box, where minimum and maximum magnetic field data along 3 axis are recorded);
f. Rotate TrackIMU along each axis until you see values in the boxes no longer change;
g. Click "Save Mag Calibration Data" button to save the compass calibration data to the on-board memory in TrackIMU;
h. The information box will display main menu again. At this moment, you can click "C. Start Tracking" button to start head tracking;
You can click "RECENTER" button to set the center or "zero" position of your head, if necessary. Now, you can rotate you head left and right, up and down, or along any vertical axis to see how the cartoon helmet moves with your head.
A video here shows you the whole process.
Use TrackIMU
Step 7: Open "opentrack" software

a. in the "Tracker" combo box, select "Joystick input", and click the button next to it, you will open a new window;
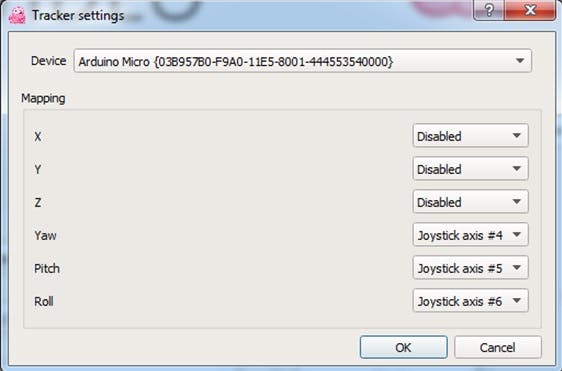
b. in Device combo box, select "Arduino Micro", and set the mapping as shown in the figure. Then, click OK to return to opentrack;
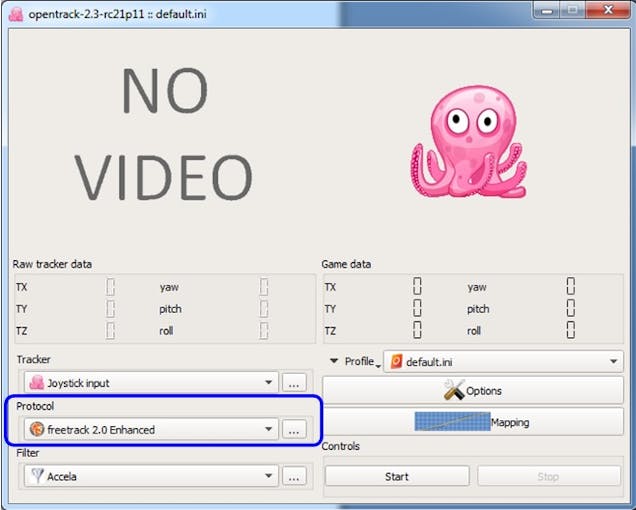
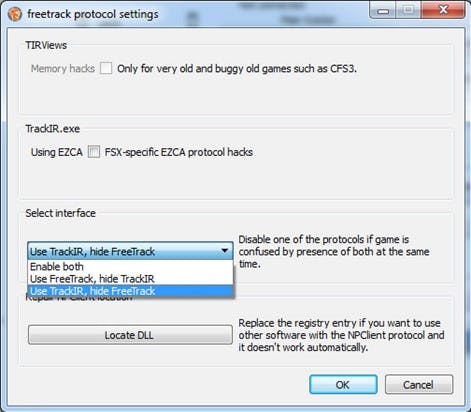
c. In Protocol area, select "freetrack 2.0 Enhanced", and click the button next to it, and select either one or both. Generally, it will just work. Unless you have other hardware that causes conflict.
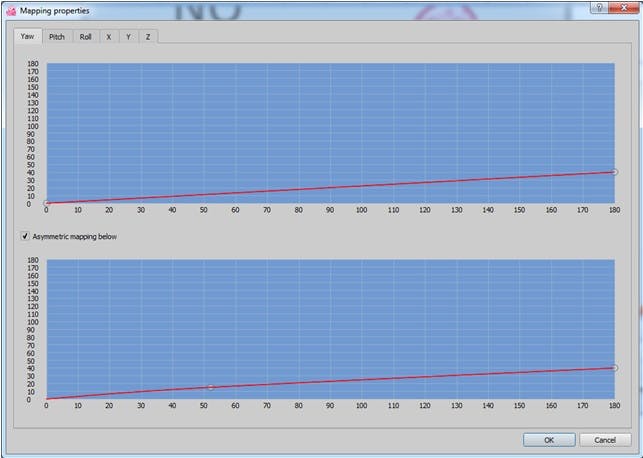
d. Click the "Mapping" button on the main interface, as highlighted in the figure to set up the sensitivity you like. This step would be based on individual games and your own preference.

You may do some experiment with your game to see what sensitivity works best for you, and you can always tweak them as you like. Repeat the setting for "Yaw", "Pitch" and "Roll". No need for X, Y, Z, TrackIMU has not provided distance tracking yet.
e. Keep "OpenTrack" running, and start your game. TrackIMU integrates compass for drift correction. So you can play your game as long as you want and no need to recenter it. It is powered by your computer, so no battery needed. Thus, you can play your game without any inconvenient interrupt. Enjoy TrackIMU and your game.
No country selected, please select your country to see shipping options.
No rates are available for shipping to .
Enter your email address if you'd like to be notified when TrackIMU (DIY Kit): IMU-Based Wearable Head Track can be shipped to you:
Thanks! We'll let you know when the seller adds shipping rates for your country.
| Shipping Rate | Tracked | Ships From | First Item | Additional Items |
|---|---|---|---|---|
|
:
|
No shipping info available.
Set destination country to see options
Shipping to starts at
Free shipping is available to !
Ships from
This item does not ship to .
More Info
Sign up to get notified when this product is back in stock!
$29.95
Free Shipping!
$49.95
Free Shipping!
$125.00
Free Shipping!
$69.95
Free Shipping!
$75.00
Free Shipping!
$8.99
Free Shipping!
$129.00
Free Shipping!
$11.89 $13.99
Free Shipping!
$24.99
Free Shipping!
$48.99
Free Shipping!
By clicking Register, you confirm that you accept our Terms & Conditions
We recognize our top users by making them a Tindarian. Tindarians have access to secret & unreleased features.
We look for the most active & best members of the Tindie community, and invite them to join. There isn't a selection process or form to fill out. The only way to become a Tindarian is by being a nice & active member of the Tindie community!
